Flatwork is an essential element of competitive horseback riding, referring to the portion of the ride that takes place on a flat and even surface. During a normal equestrian event, horses will have to perform a series of jumps. In between and around these jumps are flat portions of ground where additional tricks and movements will be executed. Flatwork exercises will help improve your riding on these portions of the course.
 Turning Your Horse
Turning To The Left
The rider first checks their position, then to turn the horse to the left, the rider looks to the left and turns slightly through their waist and shoulders into that direction. Then using the inside rein (left) the rider applies gentle pressure to ask the horse to look to the left, the rider should just be able to see the horses inside left eyelash, if the rider can see all of the horses left eye then they have over bent the horse. The riders outside (right) rein controls the amount of bend to the left and also controls your speed. The riders applies pressure on the girth with their inside (left) leg to encourage the horse to maintain forwards movement and to bend to the left where the bend gets pushed into the outside rein for control. The riders outside leg moves a couple of inches back behind the girth, pressure is only applied with the outside leg if the horse starts to fall out to the right during the turn to the left,it is at this point that the outside leg gently squeezes to help control the hindquarters.
Turning To The Right
The rider checks their position, then to turn to the right the rider looks to the right and turns through their waist and shoulders to the right, then using the inside (right) rein, gentle pressure is applied to ask the horse to look to the right. The outside ( left) rein controls the amount of bend and the speed at which the turn is done. The rider applies inside leg pressure on the girth with their right leg to encourage the horse to keep forwards movement, while the outside left leg moves back behind the girth to control the hindquarters through the turn.
Before turning your horse use a half halt to prepare them for the turn this helps to lighten the forehand and engage the hindquarters it also helps them to know that you are about to do something and therefore makes them more attentive to the aids when applied.
During the turn a half halt can also be used to rebalance a horse and stop any rushing from occurring, If a turn to the left is being ridden then the outside right rein will be used for the half halt and if a turn to the right is being ridden then the outside left rein will be used to ride the half halt.
Changes Of Rein
In any schooling session, several changes of rein are required. A change of rein is where a complete change of direction occurs. This helps to keep the horse supple on both sides as well as preventing boredom. There are seven official changes of rein, which when ridden correctly will allow the horse and rider to smoothly change the direction in balance and harmony. The seven changes of rein are
Long diagonal from M to K, H to F, K to M and F to H.
Short diagonal from H to B, K to B, F to E and M to E.
Up the centre line from A to C.
Across the middle from E to B.
Four loop serpentine.
Two half circles, either 10 meters or 20 meters. for example H half circle to G, and from G half circle to M to change the rein. Half 10 meter circle that returns to the track , these can be ridden from H returning at E or K,From K returning to E or H,from F returning to B or M and from M returning to B or F.
Circle
The three main sizes of circle, that are used when schooling or in competition are the 10 meter, 15 meter and 20 meter circle. When schooling they can be ridden anywhere in the school where space allows.
What to look for:
When a horse is on a circle it should be bending into the direction of the circle. Circles help to get the inside hind leg to push through and activate the horse from their hindquarters whist at the same time encouraging balance, suppleness and rhythm throughout their entire body. Whilst on a circle the horse should remain tracking up, with their head level and not tilting. The horse should have a slight bend to the inside, just enough so that the rider can see the corner of the inner eyelash as a guide if you can see the whole eye and side of the horses face you have too much bend.
Asking for a circle
To ask a horse to circle will require several aids in varying quantities. The inside rein asks for a slight amount of bend, to enable the horse to be looking into the direction it is moving in. The outside rein controls how much inside bend you have and it also controls the speed. The riders inside leg should remain on the girth, from here it encourages the horse forwards as well as asking the horse to bend around it. The riders outside leg moves back one to two inches to be behind the girth, it is the outside leg which helps to prevent the horse from falling out too wide. The rider should turn through their upper body so that their shoulders follow the horses shoulders and their hips follow their horses hips, This allows the rider to be following through with the horse on the circle.
Accurate riding of a circle
To ride an accurate circle takes time and practice. Good judgement of the height and width of the circle you have ridden are essential for assessing accuracy. Start off by placing cones at key points around your circle, imagine your circle as a clock face and place your cones at 12, 3, 6 and 9 o’clock respectively, this will mark out the four main quarter points of your circle, which allows you to curve around them. It is useful to start your circle off at a school marker, this will not only help to prevent drifting off course, but will also give you an exact place to start and finish.
Accurate 10m Circles
To ride an accurate 10 meter circle from the marker E in a school that is 20 by 40 meters, you can use the centre line as your height marker as this will be exactly 10 meters in from the track. Place a cone just off the centre line, so that when the circle is ridden the horse will pass straight over the marker x which is on the centre line. Place your second cone on an inner track opposite the marker E. Then find the centre point between X and E and pace the distance from the centre to E, return to the centre and pace the distance out to either side of the centre placing a cone at the quarter and three quarter point.
Accurate 15m Circles
To ride an accurate 15 meter circle, you can use the cones in the same way as with the 10 meter by placing them at quarter points. To judge the height from the marker E, you can use your three quarter line as it is 15 meters away from the track,( or 5 meters away from the marker B).
Accurate 20m Circles
The best way to ride an accurate 20 meter circle is to start it off from the marker A or C, by doing this will give you the marker X as your height marker as the marker X is situated exactly halfway on the centre line between both A and C and E and B. Due to the width of the school being 20 meters wide, then you should place your cones at quarter points around your circle on a slightly inner track. Whenever riding different sizes of circle it is important to remember that the bigger the circle the easier it is for your horse as the smaller the circle the greater the degree of collection and impulsion is required and therefore a greater degree of stress and strain. Always give your horse a good selection of sizes, and practice with the cones until you become proficient and then you can ride them without cones.
When to use circles
Once different sizes of circle have been mastered then you can ride them to balance a horse, prepare a horse for a transition or for some lateral work, help to slow down a horse who is rushing and also ride half circles to change the rein. Half circle exercises include a half 10 or 15 meter circle that returns to the track to change the rein. Two half 10, 15, and 20 meter circle that form a S shape. You can also add circles into the loops of a serpentine, to either end of a five meter loop, and to figure of eights.

Flatwork Introduction
Walk
The walk is the most basic movement of a horse in flatwork. The different types of walk are collected walk, medium walk, extended walk and free walk on a long rein.
How To Ask For The Walk Pace:
To ask a horse to walk on, first preparation of both horse and rider is required. This involves the rider checking their position is correct and that they are ready to move on. The rider, keeping their heels down and lower leg in position on the girth, gently squeezes inwards. At the same time the rider while looking straight ahead, softens the rein contact to allow the horse to move forwards.
Once in walk the rider needs to remain tall, and be sitting equally on both seatbones with the seat and upper body square in the saddle.
The rider should have a soft and elastic rein contact, allowing their hands to move freely with the movement of the horse. and with no tension throughout the rest of the riders body either.
The whole of the riders inner leg should remain in close contact with the saddle and side of the horse, with the lower leg gently squeezing to maintain forward momentum.
Care must be taken not to let the leg grip up, especially with the knee, as this causes the inner leg to pivot on the knee and brings the lower leg away from the side of the horse, which in turn draws the heel up giving the rider an insecure lower leg. The seat needs to stay central in the saddle with the rider sitting equally on both seat bones. The upper body should remain straight and not tip forward when the lower leg is nudging as this unbalances, the rider needs to turn through their waist and shoulders without leaning to the side or forwards when they are ready to ask for a turn or change of direction.
Trotting
The next pace up from walking is trotting. This is a two time rhythm which means that the horse moves its legs in diagonal pairs, for example when the near hind and off fore are elevated off the ground, the off hind and near fore will be on the ground supporting the horse and propelling them forwards. Types of trot are working trot, collected trot, medium trot and extended trot.
Asking For Trot
To ask a horse to trot on, first preparation of both horse and rider is required. This involves the rider checking their position is correct and that they are ready to move on. The rider, keeping their heels down and lower leg in position on the girth, gently squeezes inwards. At the same time the rider while looking straight ahead, softens the rein contact to allow the horse to move forwards into the trot.
Once in trot the rider needs to remain tall, and be sitting equally on both seatbones with the seat and upper body square in the saddle, and let their body stay relaxed and moving with the horse, after a few strides of sitting the rider should go into rising trot.
The rider should have a soft and elastic rein contact, allowing their hands to move freely with the movement of the horse. and with no tension throughout the rest of the riders body either.
The whole of the riders inner leg should remain in close contact with the saddle and side of the horse, with the lower leg gently squeezing to maintain forward momentum.
The two types of trotting are rising trot and sitting trot. Sitting trot is done for the first few strides of trot to enable the rider to relax into the rhythm of the horse, then rising trot should begin. Rising trot is where the rider rises up and down in time with the horses two time movement, therefore making the rider rise up when one set of the horses legs are suspended in the air and sitting down when that pair of legs hits the ground, depending on which rein you are on will dictate which pair of the horses legs you should be sitting too, this is known as riding to the correct rising trot diagonal.
Common faults of rising trot are tipping forward, which unbalances both rider and horse, tensing up though the back therefore not remaining supple, sitting down heavily into the saddle which shows that the rider is unbalanced and makes for a very uncomfortable trot for the horse, looking down when in the trot and not forwards and ahead which will also encourage more tipping forwards and rounding of the shoulders, using the rein for balance instesd of the riders own body and position. The lower leg should remein on the girth area of the horse with the heel down, if the heel comes up then the rider is gripping up with their knee and balancing more on their toes than on the ball of their feet, care must be taken to try and use the riders whole inner leg for balance and security.
Sitting trot enables the rider to remain in close contact with the horse and when both horse and rider are warmed up sitting trot can be done all the time as it hepls the rider to feel what the horse is doing underneath them especially when riding lateral work.
Common faults of sitting trot are tensing up through the riders back, this causes the rider to brace themselves against the horse and can cause the rider to bounce a little in the saddle. By not relaxing into the trot will in turn also cause the horse to tense up through their back.
Canter
The next pace up from trot is canter. This is a three time movement which has a moment of suspension in between each canter stride. The horse can be on one of two canter leads depending on which rein they are on. On the left rein the horse will pick up left lead canter, this is where the horses off hind strikes off first followed by the near hind and off fore together and the near fore being the last footfall to go down. The different types of canter are working canter, collected canter, medium canter and extended canter.
On the right rein the horse strikes off with their near hind first followed by the off hind and near fore together and the off fore being the last leg to go down.
Types Of Canter
Working canter, collected canter, medium canter extended canter and counter canter.
Asking for canter:
Depending which rein you are on will determine what your aids are for canter. If you are on the left rein then the aids are as follows:Rider first checks their position is correct, then goes into sitting trot ready to apply the correct canter aids.
Rider prepares the horse for canter by ensuring that they have an active and attentive trot. To begin with the best place to ask for canter is in a corner as you will allready have the horse looking and bending around the corner.
Rider looking straight ahead places their left leg on the girth where it gently nudges to energise the forthcomming transition. Right leg moves back behind the girth where it will nudge gently to activate the horse to stike off with the off hind first. The outside right rein maintains the horses speed as well as preventing them from drifting when the transition occurs. The inside left rein asks for a small amount of bend to the inside, this bend also suggests to the horse that you would like left lead canter.
The rider must stay tall in the saddle and relaxed through their back, seat and shoulders during not only the upward and downward transition but also when in the canter itself.
Common faults when riding canter are tipping forward in the upward transition to canter, over holding through the rein contact therefore preventing the horse from riding up into the canter transition, this is often accompanied by tense shoulders and arms which prevent the rider from having a soft and elatic rein contact. Dropping the rein contact completely and therefore losing control of both horse, steering and balance. Tensing and tightening up of the seat and back which leads to the rider almost bracing themselves against the canter, this is often accompanied with a heavy “thump” to the seat of the saddle, this makes for a very uncomfortable canter for both rider and more importantly the horse.
Menage Layout
In the schooling area there should be markers placed around the edge as follows, below is the layout for a school which is 20 meters by 40 meters.
Riding School Layout:
C
H G M
E X B
K D F
A
With every trot change of rein, the rider must also change their rising trot diagonal. This allows the horse and rider balance more easily on the turns and corners of the rein that they are riding on. This is because as the horse turns for example to the left, then the rider should be sitting when the horses near hind and off fore and on the ground and the off hind and near fore are up in the air, by doing this the rider has their weight on the near hind which allows the horse to push through from behind and balance whilst on the turn.
By looking at the horses outside shoulder and watching it move forwards and backwards will help the rider to see whether or not they should be sitting or rising to the trot stride. When the horses outside shoulder is back it means that the rider should be in the sitting part of the rising trot, and when the outside shoulder is forward the rider should be in the rising part of the rising trot. To change a rising trot diagonal the rider simply stays sitting for one extra sitting trot beat and then continues with rising trot. The more experienced riders should not need to look at the outside shoulder but will be able to feel through their seat, if the diagonal is correct or not.
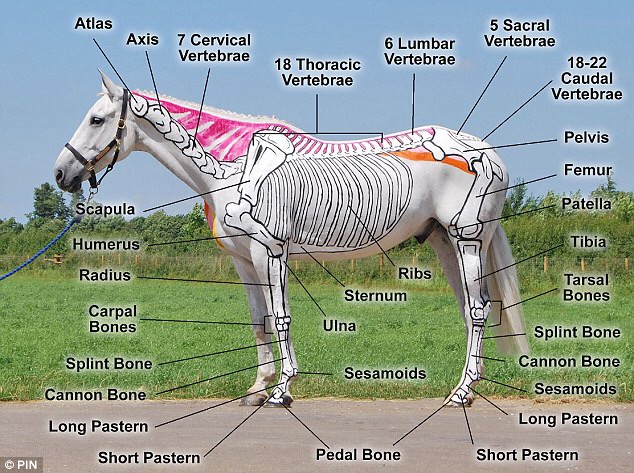
It’s a very complex subject so I suggest reading a lot of books and looking at diagrams 🙂
http://www.thedigitalhorse.com/dressagetestclassroomexample/
Share this:https://adrianasassoon.wordpress.com